Monday 28 November 2016

Upcycle: Jamie Christina Mission tank & Little Tailoress Emmeline in stretch silk

This was another Goodwill interpretation.  I found a size-XL Halston stretch silk muumuu, and got to work destructing.  (Still forgot a pre-demolish picture, sorry.)

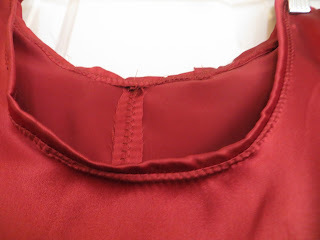
First I made another mission tank.  I got a bit lazy by the bindings because I had to piece them.  I used a zig zag on all the edges for finishing, which started out when I zig zagged the center back and then just carried the theme through.  The new sewing machine doesn't seem to have very many settings for the zig zag - you can't get it very wide, and it pulled the silk into a little tunnel which was irritating.

Unfortunately, stretch silk may indeed be stretchy, but that doesn't mean you can indiscriminately use the same sizes that you use for other stretchy fabrics.  This top is way too tight in the bust.  I did extend the line from the bust to the hem a bit more A-line than the original pattern so it skims below the bust, but not on me!  Best for my friend R!


After I finished that, I made an Emmeline - using my old pattern with the Polly top hem.  My energy for this was flagging by the end and it sat around awhile.  I wanted it to be much nicer than my blue Emmeline - I didn't cut my French seams before flipping them so the blue one has lots of threads leaking everywhere.  Not to mention that using the rolled hem foot didn't really create nice armholes.  The stretch silk was a great option for this because it has a nice loose drape but it's stretchy and comfortable to wear.

For this one after the French seams, I inspected the armhole and then did a kind of accordion maneuver instead of binding it.  I got this idea from some RTW and I hope it doesn't end up looking ragged, but it followed the natural folds that the French seam had done and it was relatively easy.  Then I carried this effect through by only sewing the bias to the inside and then cutting it all even - again, will this turn ragged?  Not sure.  I made a fine rolled hem by hand just because.  My design features mean that this shirt functions reversibly!  The matte side is the technical exterior, but the French seams of the shiny version are all matching design lines and I could absolutely see it being worn both ways.


I was sick of the Emmeline pattern after this.  My initial goal with the Emmeline pattern was to do something really simple with silk, and the indistinct armholes (not even mentioning the other two versions of the Emmeline, which I think are terribly drafted in the arm), make it hard to get that nice clean finish, and so I doubt I'll play with the Emmeline anymore.

Whereas eventually I'll make a few more Missions : ) 

Friday 25 November 2016

Waffle Dropje vest in star canvas

This project was imagined behind my eyeballs for months.  I thought of all the positives of the Dropjes that I did last year and all the reasons they DID NOT work.

It went like this:
The size 34 for my friend (see here) was a stretchy cotton with stretchy lining.  It was so amazing and cozy.  I really need that stretch!  I was just figuring out how to bag the lining though so I added some unnecessary facings. 

The size 36 for me (see here) was so fluffy, but it was too square.  It was too solid.  It was unflattering.  I did use the size 34 length and that was just barely the right length.

So I thought: I need to have some stretchiness but it needs to be small.  Plus I have this stunningly fabulous star print canvas from Miss Matabi's etsy store and I want to do something amazing with it.  And THEN I realized that this annoying fragment of stretch silk was a perfect contrasting shade of yellow.  And I got thinking: if I made the hem and the side panels from a stretchy knit, and used the stretch silk lining, I would get the stretch that I wanted while being able to use my little piece of star fabric.  Also by having a stretchy bottom it might be more fitted.  That was my plan. 


Yes, the lining sticks out just a tiny, I think I didn't snip enough around the bottom of the armhole.  But it's just a tiny bit, I both understitched and topstitched


I had to jigsaw the pattern pieces and cut painstakingly and the hood ended up being in two pieces and on the crossgrain. 
I also for the first time EVER actually used topstitching thread.  Whoa, it's really thick!  And scary!  No hiding mistakes here - I think a lighter colour would have been a bit better, or purple, but there wasn't a lot of selection. 

I put together the exterior while waiting for my dad to send me the lining, which I stupidly didn't bring with me when I moved.  I wanted to get the two parts together before going to Europe so I could make sure to get a good riri zip in Munich.  There is a nice shop which will shorten zips and it has a great selection.  I also thought just maybe something from my stash would work - the rest of my stash was also still living in Munich.  So it didn't quite get done, in terms of the lining being ready, but I did get a few zip options in Munich so I could choose the best one.

Then I got nervous I might mess it up so I dithered by making a bunch of things I didn't care about.  It sounds like all I do is sew lately but I promise I do other things too.  Luckily after making the Halifax Hoody x2 I was really on top of sewing buttonholes for hood strings and putting in separating zips...

I sewed the hood together before the armholes.  Don't do that!  I guess the burrito method for the armholes would have been much easier but I did manage and then understitched and topstitched (invisibly.)  I ended up going with a lighter weight zip so that it would not get in the way of the beautiful star pattern.

Nothing else shocking on construction.  I put some lightweight, slightly stretchy interfacing on the edge of the hood and along the zipper of the silk lining, so that it would be a little stronger where the zipper and the hood string go.  I used fusible web when it got to folding the hem and stitching it in the ditch, plus I used way more pins and attention than I think I ever have before.  It was necessary because the rib binding is way more stretchy than the body of the vest, and in fact there was a 2cm spot near one side where I didn't catch the hem binding properly and I think I went back over it six times with increasingly bad results, because it kept pleating instead of sewing straight.  I needed the support from sewing the entire bottom together otherwise I might have even considered hand stitching that hem up. 

I'm really happy with my vest.  It's exactly as I pictured and while it's not quite weather-appropriate I've been finding ways to make it work anyway. 

Thanks for Meredith at No Basis in Reality for yet another photo shoot! 

Sunday 20 November 2016

Hey June Halifax Hoodie take 2

Hot on the heels of my first Halifax Hoodie, I made a second one, still in size S. I cut it out before the first was done, optimism springs eternal and so forth.  I guess this is an example of when a functional muslin is great.  Because I had a lot of anxiety and took forever to make the first hoodie, and the second one took a day.  This was partly a learning curve - new sewing machine, with buttonholer, zipper foot, etc that I didn't know how to use and was anxious about.  On the second version there were no such problems. 

Sometimes, though, a project is great because of great fabric.  This is lightweight, dry feeling scuba material from emmaonesock, by Theory.  It's sold out.  The black inside is slightly more cottony feeling, while the outside is smooth.  In order to use this fabric I had to make some changes to the pocket binding, but other than that it simplified the process dramatically, because of course this stuff doesn't need any finishing!! 

The only, and obvious, fit change I made was to shorten the bodice by 4".  So, be warned.  If you are long of torso, the Halifax Hoodie will fit you like a dream.  If you are like me: 5'4" and with functionally no space between your ribs and hipbones, this thing will be like a sweater-dress. 


My pictures were taken while out dogwalking; I thought it might be nice to see something in use for once.  That totally means I was caught in every photo with a weird expression on my face! Also I haven't sourced a string for the hood but the buttonholes are functional.  They are in a really strange location, 1/3 of the way up the hood.  I would recommend  putting them much lower down. 


So, more on the fun of working with scuba:

As I noted, I had to do some work on the pockets.  In fact I had to cut one pocket out two or three times.  The binding as instructed didn't work, because the binding was too short and didn't stretch.  A longer binding did fit, but it stuck out on the curve, because scuba has too much body to lie flat on a curve like that.  I tried a different colour cotton jersey binding, but having a second color and type of material was too distracting.  So in the end I drafted a little facing by just copying the top curve of the pocket, and then understitching and flipping it inside.  I topstitched it down and cut off the excess.

Edges: I didn't fold over edges on the pockets, I just sewed them flat.
Similarly, I didn't finish the: jacket to hood seam, the zipper seam, or the jacket to hem seam because they look just fine hanging out.  What I do recommend is to finish these seams by cutting all except one seam short, and just topstitching that one down - like a faux-flat fell seam.  That would enclose the loose edges and look cool on the inside (although the seams don't bother me.)  So obviously I skipped the twill tape this time, and I'm glad of that because I still don't know what I think of it. 

I did find that the scuba had enough stretch to use it as the cuffs and hem without any change. 

I'm really thrilled with this hoody and everyone is impressed because it looks professional.  I have a sexy riri zip that I brought back from Switzerland, specially cut for this project, and for once it was even cut to the right length. 

My only final thought about the scuba fabric is that this particular fabric is thin scuba with a cool feel, and although it's good for layering since things slide over it, it isn't very warm.  I think it'll be best in spring when I just need something to take the edge off - here it's already frosty in the mornings!

Friday 18 November 2016

Grainline shibori Scout & Hemlock tee

In my endless, slow progress toward a well-fitting Scout, this version is for my cousin who is basically the same size as me. (Previous Scouts here, here, here, here)  It's a size 4 at the top, going to a size 2 below the armscye.  No other changes.  It's interesting to see all my trial Scouts in different fabrics, but the main lesson (other than ugh, silk-velvet) was that a shoulder widening didn't improve the fit across my back.  This version is much better.  I will add in a sloping shoulder adjustment to my next Scout...but I'm hopeful that I'm finally nearly arrived at my goal!  

Making a Scout is pretty easy.  I french seamed the shoulders and sides, and therefore forgot what the seam allowance was to set in the sleeves, which I refuse to french seam, but it didn't influence the fit (I sort of went from 5/8 to 4/8 on one sleeve.)  The fabric is a very densely knit cotton that I dyed about 2 summers ago, using shibori techniques. 


And I've been looking for some kind of ideal, exciting knit top.  So finally I got on the Grainline Hemlock bandwagon.  Because it's free, and the dropped shoulder started to appeal to me.  But I think this top needs a fabric with less body.  My version is just...ok.  I did what I could to make it wearable, aka I added cuffs to the sleeves and shortened the body by 2 inches.  I might make another one in a lighter weight jersey and take 2" out of the center front and center back to narrow it a bit.  Not sure yet. 


The fabric for this, as boring as it may appear, is actually interlock weight organic cotton from siebenblau in Berlin.  I love their website but they don't ship abroad, so during a recent trip I allowed myself to buy a few pieces of fabric there.  It was overwhelming!  There's still so much I wish I could have from their website!!