Wednesday 30 September 2015

Colette Chantilly & Liberty silk chiffon


The seed of this project was some Anna Sui chiffon plus bemberg lining.  6 meters of all this stuff, collected while I was in New Zealand.  I was rightfully scared of the project.  Which led to me dithering over it, and thus moving all six meters of fabric with me to the States...to Switzerland...and finally slowly collecting supplies, like extra fine silk pins (which are amazing.  Now I have nice pins, but still own no pincushion.  Ah, the vagrant life.) 

I just did not know whether I would like this dress.  But what I did finally admit is that I hated the chiffon.  So I got rid of it on some terrible muslins and thought I would mix and match using this super expensive Liberty chiffon (georgette?)  which, don't laugh, is my favourite Liberty of all time but I bought the wrong silk because I didn't know better when I was in New Zealand and now I can't think of anything else I would ever do with such light silk, plus a matching striped Liberty lawn for the skirt.

But then you know, I was playing on the floor and realised I had enough chiffon to make the whole thing.  It's very crinkly and doesn't look like enough, but it was.  So then on with the hesitating, the gelatining, and after much procrastination, the cutting.  And more procrastination.

An aside: the mauve silk twill (silk twill is my favourite fabric of all time seriously.) has been a favourite in my pile - I got it in Frankfurt last September and was planning to make the Vogue 1395 with it, which would have been stunning, but anyway I was worried about whether I would mess up the Vogue too much so I didn't use it.  


Change of scenery: I had already given my ironing board back to the hospital so I had to make due with a different corner of my flat.  Which actually provoked me to heights of creativity usually not seen in front of the camera. 

I completed the lining dress in one day and realised a discrepancy.  When you are using sheer chiffon, you need the lining outside to also be the outside (I mean you aren't putting wrong sides together, in this case wrong faces right.)  What that means is that you end up with a bunch of gathering on the inside of the dress, hanging out bothering you, plus there is a set of gathering in between the two layers which is annoying.  I really got irritated by this fact.  I wondered if I should have sewn the two layers together instead of keeping the lining and dress separate.  This discrepancy was also present around the zipper.  I guess it ends up not mattering because I zigzagged and topstitched the lining innards into submission, and between the two layers not much is actually visible even though the silk is transparent.

In the meantime, I carried on. I made a size 4 and I french seamed everything that I could.  The final dress construction was like the holy grail of moving: I started cutting this project out in August...and it is the last thing I sewed prior to dusting off and boxing up the borrowed Singer.  Yes indeed, I started it on the Pfaff and thought very seriously that I ought to finish it there too, but I ran out of time and had to see how the cheap machine would gobble up my silk.  The truth?  I don't think it did any worse.  I pinned a bit more but the slippiness of the machine was made up for by other little things that I HATED about the Pfaff like how it would slide off the side of zippers or how it was always gobbling up the starts and finishes of things. 

And after so very much tribulation, I have a wearable dress.  A bit silly in the chest area (looking down at it is worse than in photos) but I could reasonably wear it to like, picnics, weddings, the like.  The chiffon actually makes it feel sumptuous despite what I consider rather imprecise sewing.  After all this suffering I certainly WILL wear it to such events.  Let's not even talk about the zipper side and how it's not matched up by 2 inches because the first half of the zipper was accidentally put in a bit too high.  Let's just skip that bit.  It's in my armpit anyway, no one cares.  

Wednesday 23 September 2015

Francoise x2 by Tilly and the Buttons

So I do love simple A line dresses and french darts.  I was eyeing the Francoise since it came out, but not totally sure, when a friend who wanted me to make her a dress tipped the balance (she bought me the pdf.)

I am not sure why I felt the need for a muslin version of this dress. I had doubts about the fit, about how it would come together, about how to line it for version 2?  All of these things.  Reasonably so.  I cut myself a size 3, although I noted that my friend's measurements according to the size chart would also afford her a size 3, and she is smaller than I am. 


It actually required a bit of thought to get all the shoulder bits together (and I didn't have enough fabric and substituted some birds, which I don't like). The fabric is nubbly silk and very drapey.  It is not the desired silhouette for this pattern but is one that I am preferential to.  To my surprise there is no pooling over my butt - hurrah for fisheye darts!!  The front darts are a bit prominent but I found them adequately placed and I didn't have any trouble with the french dart.  The dress is a bit long - I cut about 2 inches off prior to hemming it.  However, it was too big.  I took away 1cm off the back center on each side prior to adding the zip and this fixed THAT, although then it made evident that there is excess fabric across the top back (NEVER happens to me, wtf!).  I would need to remove a wedge.  I decided to ignore this and just added the facings to see what would happen.  The gaping is evident.  I think I do mostly like this dress but I would probably also make a size 2 for myself when a next time presents. 

Version 2 in this Marc Jacobs stuff, with a Bemberg lining.
I really didn't want to make this.
It is a lot more fun to just randomly decide today to make X and then make X.
But I have promised this to my friend R since January and she loves this fabric, which is itself a small miracle.  So, it had to happen, and fast, before the sheddy fabric shedded all over my flat.


I had already sold the Pfaff and I am learning something the hard way - I think the cheap, 50 frank Singer sewing machine that I previously had (Thanks for lending it back to me, Ilenia!)  is a lot more fun than the computer monster.  And I think I couldn't have convinced myself of this if I hadn't lived through 8 months of the latter.  The cheap Singer is way easier and more fun to sew with.  Yeah, it doesn't make quite as even stitches and it's a bit harder to get the perfect tension, but I put more effort into trying (I think I expected the other machine to do everything for me.)  I thought I needed a better machine in order to become a better sewist.  Now I understand that I need a reliable machine, but I personally don't want a machine with a lot going on, because I won't bother to take the time to understand it. 

Anyway the dress.  I cut the size 2. Bemberg lining, dress, check.  It is pretty easy to put together although for some reason those shoulder pieces always look like they are lined up wrong.  Making a dress with a lining is soooo much more fun than facings.  I for some reason had really psyched myself out for this lining!  I just sewed the neck and armholes, then slid the dress through the shoulder tunnels, voila.  After that, I sewed up the sides, then installed the zip and did a Cambie finish to get the lining also attached to the zip.

And the result, I must say, is a masterpiece.  It's a tiny bit small for me, thus perfect for R, and I will in future definitely take a small wedge out from each side of the back neck.  The weight of the fabric and the lining make this dress feel really nice and substantial.  I think I would still make a size 2 for me, but use a fabric with a bit of stretch.  And a lining!  

Monday 21 September 2015

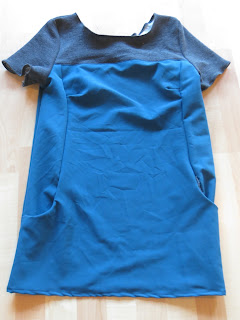
On the bandwagon with Xerea by Pauline Alice

I completely decided to do this because I couldn't resist a 60s style dress when I saw it on Sonja's blog.  She's like, my name twin, right, I have to follow her lead...

This version was a muslin for a few reasons: I am packing and don't have much fabric to choose from (every scrap I wanted to use was too small.)  Also, I wanted to try to mix up knits and wovens.  I've realised that is what I choose to wear and so if I want to make my wardrobe I need to start branching out a bit.  And the final reason - I am completely putting off making two dresses for friends and two dresses for me that seem overwhelming in the time left. So, with limited time and resources, naturally I decided to avoid everything and make another different dress.  (sigh.)


I cut a size 36.  The 38 matched me better on the size chart but the generous final garment size convinced me to go down. Size was ok but I need a shoulder widening, even on the knit it looks absurd.  So I should do a 38 in the shoulders. Also I cut it right below the pockets so it is much shorter than it's supposed to be, I think I didn't have enough fabric.

I found the pockets difficult to put together.  Sonja noted that the instructions were fleshed out for this part, but I think it does require doing it a few times to get because you create a kind of triangle and need to understand where the seam meets up.  I used the thick jersey for the pockets and that made everything worse because it was so thick, and the teal fabric is a poly blend (unusual for me, I know, but it was planned as just a decorative element for a dress that morphed into something else entirely.)  The teal fabric also has some stretch but is very drapey and relatively thin.  So the fabric discrepancy also made the pockets more difficult.

Overall I don't like this with the sleeves, possibly due to fit.
I did manage to also make view B. Still size 36.
I had the same problem with the pockets, realised why. The instuctions seem to have a discrepancy because they tell you to sew the pocket right side against the dress right side, and there is a corresponding picture. Then it says to sew the side piece to the pocket and front, right side to right, but the picture shows the back side of the dress. That is technically correct!  It just looks really strange.  You have an almost folded over seam allowance once you fold the pocket to the inside and that's why it works.


Version B, well, it had one other unexpected problem.  The center front piece?  Somehow I cut it about 2 inches too short at the top...I wondered why the side bits were longer.  I sewed it together like that to see how the pleat would look, at least, and then realised this dress had too much potential to waste.  I have no excess sewing supplies lying around, no bias tape, and the stress of getting these last projects done has half fried my brain, but I still soldiered on by cutting those side pieces even with the errant front, sewed it together with the yoke, and then nipped a bit out of the armpits.  I zigzagged all the raw edges, folded them over, and zigzagged again.  I am not sure how I could eventally salvage that as a finish (Just cover it with velvet tape and leave all the zigzags on the outside?), but for now it holds ok.  And it is very nice to have an unexpected last dress for me (the last two have been for friends).

I like this pattern, view B, quite a lot.  I am not sure how I feel about it's tenty characteristics, but I would make it in a drapier fabric like wool suiting. It definitely fits my work uniform of dress, tights, and a sweater.  (Oh, too bad I won't be working for the next three months!! So too bad!)


Friday 18 September 2015

Georgina by Republique du Chiffon

I bought this pattern last summer, along with the Lucie.  And along with the Lucie, it slummed for longer than planned.  I even printed it out!  But every time I wanted to sew it all winter, I remembered ohhh I haven't even traced it and then oohhhaaa I have to add seam allowances.  And for those reasons it waited a long time.

The fabric is blue-green, almost iridescent, shirting from Mood, bought last summer.  The back underlayer is a wool blend from the scrap bin at Nancy's Sewing Basket in Seattle, ditto.  The zipper is a Riri which means it cost like 20 franks.


I cut a size 36 even though a 38 might have been wiser.  I really enjoyed putting this together.  I had the time for it and I loved loved loved some of the details, like finishing the sleeves with bias tape.  In fact, bias tape is great!!  Just making bias tape sucks!  I also loved the tucks instead of pleats for the skirt and the bodice.  (In theory more than in practice, sadly.) I was suspicious of the cap sleeves, and very rightfully so.  The cap sleeves and the high front neck don't work with my shoulders, and when I tried it on, the front pulled against my neck very badly.

Anyway the end product is a fitting disaster.  The size is right but this just doesn't suit my body shape at all from the waist up.  I would need to do something like a 3-4 inch swayback adjustment, lower the front neckline maybe 4 inches and get rid of those cap sleeves, before I could see it as wearable.  I really love a few of the features, enough that I might come back to it and make those changes. 

Another caveat is adding a zipper to an already angled back.  It didn't go well, as you can clearly see.  I guess you have to put the zip stop at the top of the angle based on the end location of the zipper, and then cut off the tape ends in order to avoid that gap.  Also, what is a good way to finish the seams on the zipper side of a dress?  That evades me.

Monday 14 September 2015

Flowery Ultimate Trousers by Sew over It.

I cut these out in a size 10, as I was between the 8-10. The fabric feels like rayon, and was a gift from a friend who brought it back from Serbia.  I had one meter of it and actually from the start I wanted to make flowered pants (latent wish from an Italian style trend in 2002, seriously.)

And whaddaya know!  Ultimate pants!  The 10 was a good thought because of my massive muscular thighs.  The rayon stuff has a bit of stretch but I am not sure if it's the fabric or a touch of lycra - it doesn't stretch much.  I made no alterations of any kind, and used a recycled Riri zip from the market instead of an invisible zip because I wanted it to be extra strong.  Also the invisible zip I bought was 35 cm which seemed a bit silly.  I should have known this would make the pants rather less sleek on one side, but they are not really sleek anyway.  I used very light interfacing for the zip and it does still stick out a bit. Ah well, I want them to be strong for backpacking in Asia, but I guess they don't need to look perfect.

I sewed the seam allowance on the inseam down for strength, and then zig zagged the rest.  This is the first time I can recall using this technique for sewing pants: where you make the legs then insert one in the other and sew the crotch as a single line.  Quite simple - I am not sure which technique is better. I am used to sewing the crotch first, and then the legs, seems like. 


These took about 3 hours.  Including putting together the PDF.  Happy Sonia. I know I could do loads of things to make them even better - 1 cm pinched out of the front crotch, and maybe tighten up the sides just a bit so they fit more snugly...but I am pretty pleased with them and will only tighten them if they seem likely to fall off. I solicited the advice of the portuguese cleaning ladies at work (they are all very well dressed) and they agreed that the loose style should stay. 

Tuesday 1 September 2015

Another Briar!


Sorry!  It is the last one.  I am girding myself for a most terrible project and the result is this need to do all the easy things I can first...and I am addicted to making Briars.  I am totally now a proponent of making the same pattern multiple times in a row!  I am sooo good at Briars!  not like Watson bras.

I decided on a long sleeved version of the size S, same as before: 2" lengthened, then about 1.5 tapered off the back.  I had to shorten the sleeves.  They are very long.  The viscose here is very thin and light so this is quite an airy tshirt.  I wanted to put the pocket on it but I lost the rounded pocket somewhere!!  I looked everywhere for it!  No luck tonight, no pocket.


That's the end of my Copenhagen viscose supply so for now I can promise no more Briars - lots of dresses coming up!