Monday 30 September 2013

aimecommemarie - must have, plus fabric shopping in LA

Hurrah!  Vacation has ended!  Since I spent the first day of it fabric shopping at the garment district in LA, I spent a lot of the rest of the time hanging off cliffs dreaming about what I would sew when I got home.  The result was a fabric mess all over the living room, dining room, etc...and it was hard to pick something and just get started.  So I went for something simple!  Then I got totally hung up on how to finish the neckline and this has dragged on for days, until I got sick of looking at it.  I'm definitely no good at keeping UFOs around.


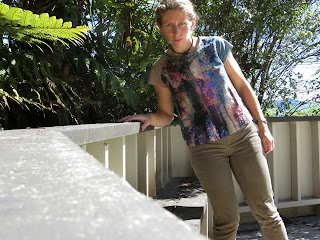
This is my first finished product by aimecommemarie.  When I first saw the patterns I knew I was in love.  They are hand drawn and overlap (boo to necessary tracing) but the instructions are also hand written and drawn with illustrations.  They are inconveniently in French, but luckily French is pretty easy to figure out.  This shirt comes as a pdf and is only three pieces.  I traced a M to start, recognising both that I need to start sizing up if I want things to fit (re: my poor Anna), and remembering that euro sizing is much more fitted in general. 

Fabric: leftover from Anna.  I didn't have enough to fold the back piece, so I sewed two halves together.  Possibly made the back a bit wider by doing that, oh well.

The pattern gives you a few options for finishing the hem and neck, but no definitive instructions.  This might annoy some people.  It left me in limbo for about a week.  I finally used black bias tape and sort of tried something new by folding it to the inside.  I like the look but it makes the neck droopy.  So I just zig zagged the sleeves because I didn't want to change their look at all.  What do you do to avoid that droopy neck??  It seems like all non-knits are prone to this problem any time you use bias tape.

Ok...so regarding Los Angeles.  Well, I had a backup plan, which was a beautiful selection from Mood fabrics that I ordered ten minutes after that 20% off sale ended.  Stupid time difference.  I shipped it to my nice friends in Salt Lake City so it was waiting for me when I got there.  In LA I wanted to find linings - Bemberg, to try it out, and some silk..  Linings have been the hardest thing to buy online, I've found.  Oh and I wanted some leather to make my Victoria Blazer because I'm totally copying Kim.  As many before me have noted, the garment district is not a great place to go when you have a flight to catch in 3 hours.  I'm also a newbie and still not great at differentiating fabrics.  Things like the Michael Levine loft were wasted on me, because too much of the fabric just felt plasticky or yuck, and without knowing what it was, I wasn't interested.  I did have some success with silk at a random shop, picking out a few colors for about $12/yard.  Compared to New Zealand prices that was total success and now I wish I'd gotten more...Michael Levine stole the rest of my time and money.  I may end up making a short-sleeve Victoria though because I'm not sure I can magic two sleeves plus the body out of the three lambskins I found on sale.  But either way - leather jacket for $50!  I'm excited...and I really hope I can manage to get that to fit!

My new return crazy enthusiasm hasn't quite worn off and I have about ten pieces of fabric in the wash and patterns have taken over the living room.  I'm trying for a few simple projects to see if that helps me get focused! 


Thursday 26 September 2013

Papercut Patterns undercover hood

I was demoralised after the Anna.  I still had a whole weekend before leaving on my holiday.  So naturally I decided to throw in a last quick project.  This took a mere few hours out of Sunday and although (eck, as always?) it doesn't fit, the changes are minimal and I think I will make it again, 2 inches shorter in the body and sleeves.


Maybe more than two inches?  Excuse the photos, they are my first attempt at using the self timer.  I am going to hunt for nice outdoor locations in future but I was too rushed before the holiday.  I cut out the XS.  The pattern does not provide a lot of hand-holding for beginners - for instance, it just says "neaten seams" leaving you to decide how to do that.  I was really glad for the Jalie long underwear experience, as that pattern suggested sewing the seam allowance and then zig zagging the edge, and that technique worked really well here.  In fact, it made me pretty cheery to work with this knit - a green merino wool with loads of stretch that I got at the end of winter sale at Global Fabrics, in Wellington.  Nothing like a pattern - and result- that is 100% New Zealand!!  Everything fit together without a hitch.  I did use the ball point needle which I've just made habit for all knits, although I have no clue how much it matters. 

Just that it's so long it could be a dress...
Luckily I have a taller friend who might be a happy new owner of this hoody. 
I could have cut out the XXS and I think the fit would also have been fine, it has quite a bit of ease.
Also it could be super cute with the hood lining and the pocket in a different fabric...

Monday 9 September 2013

By Hand London Anna dress

This will be my last post for a few weeks as I am going on a desperately needed holiday.  Well, "holiday" for some high-angle rescue training, but so so much nicer than sitting in an office.  Not to mention I will have a few hours stopover to spend in Los Angeles in the garment district!  And the training is in Utah which means it will be hot summer!  I am soooo excited (as I sit here next to the fire in my merino baselayers) just thinking about wearing shorts. 

I only traced the skirt and the bodice front, since I expected to do the longer version as well as the V-neck.  I had high hopes for this dress!!  Unfortunately I should have traced the whole thing...

I cut this dress opposite the grain because I wanted the pattern to be vertical on my dress.  That was my little bit of creativity here and I am pleased with the result.  I also used french seams for the first time!  How exciting to have such a nice clean finish : )  I'm already imagining that a lined Anna would be awesome since then it wouldn't have any flappy facings...unfortunately I'm still scared of linings, especially linings that I have to figure out myself, so that seems like a distant prospect.

It took about two and a half evenings of sewing to complete this dress once I had cut it out.  Fast!  With the french seams it also means there was not a lot of finishing that needed to be done which is always great.  Since I recently went back and finished the seams on my first few Lisette dresses, I've started to realise how much nicer it is to do all that right away and not when things have started to fray and wrinkle...and since handmade garments so far do seem to be more fragile than their store-bought cousins, it seems smart to do everything I can to make them last.

Like every project there came a total disillusion moment when I was totally sure the bodice wouldn't fit.  The pleats mean that there is a very very generous amount of space for the bust and that initially looked like way too much for me.  Yet again I had a massive discrepancy when it became time to put in the zip!  One side of the skirt was about 2 cm wider than the other...but they do match quite well on the front and sides so I guess my french seams were slightly less than 5/8" overall and led to some extra.  I ended just cutting this off to match the other side of the skirt back.  Less hesitation with it than on the Lonsdale dress (I dithered for days on that one!)  and overall this felt like a super stress free construction.   I only did one french seam backwards...oops.  I usually don't lap the fabric over the zipper, but keep it to the sides so the zipper is visible - my zipper techniques are pretty neanderthal, I think.  I was so high on how well this dress went that I lapped my zipper properly.  The result of that extra half inch?  I think I should have cut a size 8/12.  My boyfriend likes it but I can't take a breath.  Total letdown!  Of course I didn't trace enough of my pattern pieces to still be able to cut out the 8 so I'll reflect while I'm on holiday and see whether I'm ready for another try.  BHL do say their fits don't have much ease, and I would agree with that.


 Just barely warm enough to be barefoot for a photo shoot...but not a minute longer!


This is a super pattern for the wide-shoulder problem because the sleeves fit my shoulders so nicely.  However, like most people I had gapping on the back along the zipper.  I see Ginger has come up with a nice way to fix this, here.

Overall my Anna experience has been mixed.  Maybe I should have sized up, but the flappy facings also really irritate me.  I would want to use a slinkier fabric so the facings would stay in place, or line it, if I made this bodice again.  But I do love the bodice! 

Friday 6 September 2013

My first Sewaholic Lonsdale

This pattern has been top of the pile for awhile...I chose the fabric from Fabrictales and got excited to do it right away.  Then I watched the sewalong and I got excited about sewing in general but it took some of the thrill out of the dress itself (so much work...)  Now I've realised I really want to do the Minoru before it actually becomes spring and gets too warm to wear!  So this is my first Sewaholics pattern, and hopefully I'll feel ready for the Minoru soon.  (I still don't feel anywhere near ready to make a whole jacket!)

I heeded the warning about this pattern requiring a lot of fabric - quite a difficult project to cut since the bodice pieces are longer than my cutting table...I barely fit everything on my 3 meters of fabric.  Also I spent hours perusing other people's Lonsdales to figure out my size and eventually settled on a size 6 based on the length of the waistband pattern piece.  This may be one of those cases where I could have graded for a better fit - do I have an abnormally thick waist?  I cut an inch off the length to make sure I had enough fabric for the waistband, and I ended up cutting off another two inches before hemming.

Once I sewed all the pieces together I was faced with a width discrepancy.  The waistband was about 3 cm shorter than the bodice, and the skirt was altogether about 2 inches wider than that...I was nervous about it fitting but I was also overwhelmed at trying to get all the pieces neatly lined up and properly in place along the zipper.  A few interesting trials ensued as my boyfriend tried to help me try on the dress full of pins.  Luckily I just barely had enough room to pull everything together at the bodice. 

I do think this is the first time I've actually tried on something nearly complete and had to make the final adjustments myself...the pattern couldn't advise how to make the zipper look pretty at this point!  I might have been wise to just cut out a wider waistband piece.  Others have commented that the interfacing shrinks the fabric and I guess that's what happened to me.  Since I noticed it right away I certainly could have made a new, longer waistband. 

Overall I'm pretty satisfied with the fit.  I am not sure whether I should have shortened the bodice slightly.  I'm really short waisted but I haven't done any bodice shortening on my patterns yet.  The skirt was big enough that I just hacked out about 2 inches in the midback to make it line up with the bodice, then I hand stitched about 1 mm of the waistband over so I would have a neat zipperline, and with those modifications everything lined up, more or less.  It's definitely not the most perfect of zipper installations. I also attempted to sew down one side of the zip, across, and back up.  As anticipated the result of that was that my back isn't quite even...if I were doing the bow across the back it would be hidden.

I also didn't understand that you're supposed to sew the dress to only one waistband, and then tuck the inner waistband in to hand sew it.  (I would totally have sewn in the ditch!  I love doing that!)  I sewed all the layers together and when I realised what I should have done I used my shears on the loose end.  It's still the neatest finish I've ever done!  I also really like how the double bodice gives this dress some structure.  Most of my hand sewn dresses have so far felt too flimsy.  I put a lot of effort into finishing this dress.  For some reason I put hem tape on all the seams (I didn't read that part of the sewalong closely enough and realise I could just fold them over for an equally nice finish, shown here.)  So now I'm a hem tape expert.  I can comment that putting hem tape on seams is stupid if you have also cut your seams down from 5/8" because at least I found that I had a very uneven edge to work with and the hem tape didn't always behave too well.  Anyway now I have a very thoroughly finished skirt : )

For the hem I just sewed hem tape along the edge and then folded it up and sewed a normal machine hem, fitting in wrinkles as necessary to make it work.  I have spent a few evenings hand sewing facings down in my previous projects but I'm still not ready to consider hand sewing a big hem.

I also planned ahead to make normal shoulder straps instead of the bow.  I left openings in my bodice and adjusted the straps to fit, then inserted them in and sewed them down.  I just sewed a fancy triangle to hold them down, no hand sewing here either, but this made me sure they would hold.  Of course it was hard to snip off 2 feet of my beautiful straps!  If I did this pattern again this way I could save fabric by cutting the bodice straps quite a bit shorter - if you aren't threading through loops and tying a bow, you don't need nearly as much length.


This dress is so comfortable once it's on!  That is something you don't know ahead of time, but it definitely makes me keen to repeat this pattern.

Wednesday 4 September 2013

Grainline Scout in silk - take 2

I thought I would give the Scout one more try.  I had a remnant of heavyweight black silk and this seemed like a great use for it.  I don't know what kind of silk it is, but ironing it turns it shiny (oops) and I can actually hear my needle snicking in and out of it.  Pins, needless to say, were a torment to put into it and so one goal of this easy construction was to use no pins.  Luckily the silk is very well behaved so that wasn't too crazy of an idea...

I unfortunately didn't notice that my roll end had a little chunk cut out of the bottom when it was folded.  As it was I had to cut two pieces to get my back length and the little triangular hole was a source of some creative reflection.  Also no way was I going to cut bias tape for this.  The only silk bias tape I had was white so I went with that. 

I cut a size 0.  For a perfect fit I would have found the size 0 with size 2 armholes to be better. I pleated the sleeves as I sewed since I didn't want to bother with gathers, and it miraculously almost matches on both sides!


I still don't love the Scout and I doubt I'll make it again because even the size 0 is shapeless.  There's nothing about it that makes me want to try out my barely-there drafting skills...